I made another, brief post about crafting this PNP game elsewhere in the forum, but I’m here to talk about playing it.
Yesterday, I was able to sit down and attempt a run throughThe Promise from a friend of the channel and frequent contributor here in the forum, @GWRaoul of Grimm World Games. Here’s his itch if you want to see his work.
The Promise is (I would say) a print-and-play, 2-handed solo (or 2-payer co-op) overland rogue-like skirmish-crawl with a whole lot of interesting design. If you like Iron Helm but want something with a larger variety of decisions and less luck-based character progression – and if you don’t mind trading away some of Iron Helm ‘s “arch”-fantasy theming to get that added mechanical texture – I think you would enjoy taking a look. When was the last time you saw a game do all this with 18 cards (only 14 on the table) and some dice? (OK, I have some tokens too but those can all be replaced by dice-trackers and eurocubes.)
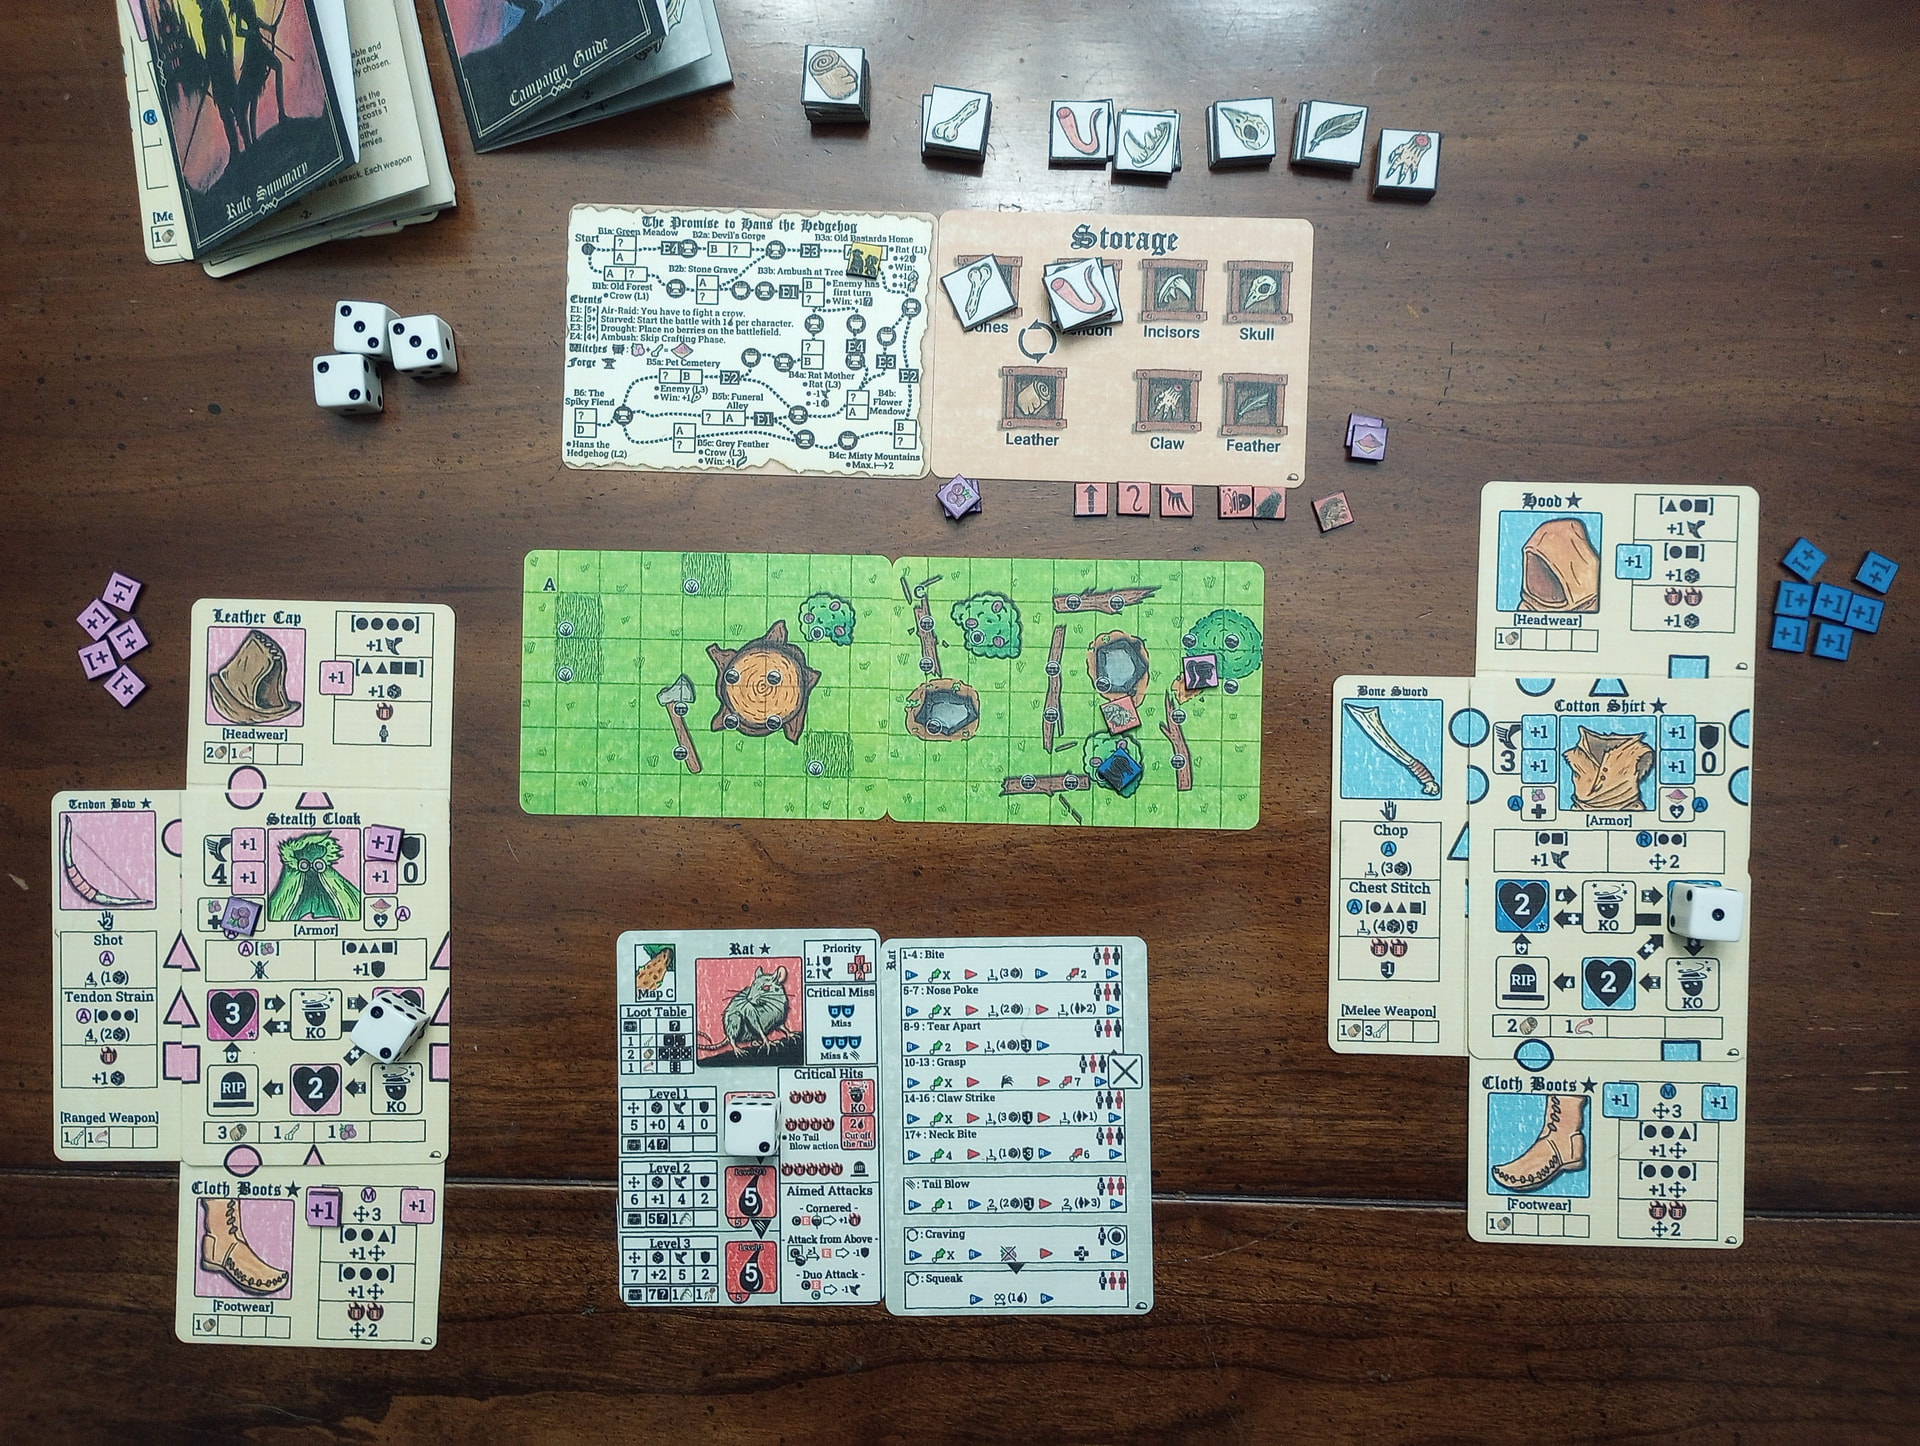
It looks a bit busy at first, but I’ve found nearly all my rules questions are already answered in the rulebook, and all this iconography is given a very clear meaning that’s not hard to pick up. I’m asking the designer about just a few loose ends elsewhere in the forum.
Shown on the left (pink) and right (blue) are the character ‘boards.’ Want to hear more?
Each character is assembled from Equipment cards (headgear, armor, footwear, and up to 2 weapons). These are double-sided and all (except the armor) are orientation-dependent as well. So, for example, there are four different boots on each Boot card, but you can only see one boot-per-card in my image because of how the boot card is tucked under the armor card.
The armor card dictates your max HP as well as how your HP ‘devolves’ when you take damage, which is tracked using a die. This is non-linear and I won’t try to explain it better than the rules do, but as the die moves clockwise around the flow-chart in the middle of the armor card, you go through cycles of taking damage, then being KOed for a round, then waking up ready to take more damage – but get KOed enough times and you’re dead. Healing abilities are rare within combat and won’t always fully restore you back to where you started, but it all resets after.
In this image, both of my characters have been KOed and taken damage (and healed, and been KOed, and taken damage).
Each Equipment card grants its own stat bumps and abilities, but they also synergize. Synergies between cards are marked when you form a closed, regular figure at the ‘seam’ between cards. So, for example, those big pink and blue circles above my characters’ boots can be (thematically) understood as speed bonuses. If your Equipment-set creates enough additional synergies/figures, then your character can access special abilities, which are notated in brackets on a variety of cards. It’s a very clever use of space to create an intricate ‘ecosystem’ of abilities. Swapping out a single piece of equipment can shift your playstyle quite a lot, and you need to think about how to sequence your upgrades to keep your build functioning while it evolves into new possibilities.
I am still getting a feel for this system, but I find it interesting. (Does it make sense if I say it is both fluid and crunchy?) I have not progressed far enough to get a feel for how well balanced all of this is in the late game, but I am hopeful that the design is thoughtful enough to bear weight.
At the top (white/brown) is the campaign map and my inventory.Want to hear more?
The map’s branching paths, each with unique encounters and unique sequences of encounters, provide some strategic depth that I am only just beginning to understand. You need to travel to combat encounters (marked on the map as 2 adjacent rectangles) and slay beasts to gain the ingredients you need to craft new gear. But you only get to do crafting if you travel to a crafting encounter (marked on the map using an Anvil icon). And you can only carry a very limited quantity of each ingredient. So, planning your path is an efficiency puzzle: you need to schedule enough combat encounters before crafting that you’ll have the ingredients you need to craft, but you want to schedule crafting encounters frequently enough that you burn down inventory so that you’re not doing combat for no payoff. Throw in some paths where you only get a chance to do crafting if you roll right, and give the player the option to choose harder combat encounters with larger payoffs, and you’ve got a recipe for pressing your luck right into sweet, rogue-like death.
Want to bring a character back to life? Then you also need to plan your path to ensure you encounter a Witch’s hut, the only place in the game where you can craft resurrecting “life powder.” But crafting life powder will only be possible immediately after a combat phase, since you need to bring berries that can only be gathered from combat maps and that go rotten . So you really need to plan for death before it happens, since you’ll likely need both characters alive and kicking if you’re going to through combat and make it to the Witch with berries in-hand.
In my image, the yellow token on the Campaign map shows that my characters have arrived at battle location B3a, “Old Bastard’s Home,” where I need to fight a unique Level1 Rat (“Old Bastard” himself, I gather) who has some uncharacteristic armor points and who drops some rare loot.
In the middle (green) is the map for my current battle encounter. Want to hear more?
When you reach a combat encounter on the Campaign map, you arrange 2 double-sided combat map cards to form the grid/field for your skirmish. The selection of which combat map card sides to use, plus their positioning relative to each other, is dictated by a mix of (a) information shown on the Campaign map, and (b) information shown on the Enemy card. Sometimes you get to choose the enemy and difficulty, sometimes it’s dictated by the campaign map. In the current iteration of the game, there are 2 enemies (a crow and a rat) each of which can appear at 3 difficulty levels, plus 1 boss (Hans, the hedgehog) who only appears in the final battle. I believe you always fight a single enemy at a time.
The enemy’s starting position is fixed. Your characters start in a cell of your choosing in the row or column furthest from it. Berries are placed on trees if there are any, and these can be used in combat to heal (but you need to ‘waste’ an attack Action to collect and eat them). Terrain offers barriers, height advantage, and restrictions to line of sight. Your equipment grants you one-use-per-turn Move, Combat Action, and Reaction abilities. Combat proceeds back and forth in Character phases, then an Enemy phase until somebody is defeated. You lose combat (and the whole game) if both of your characters die, you win if you defeat the enemy.
Attacks are dice-based but sophisticated. First, roll a number of d6 dictated by your Equipment. Any rolls >= the enemy’s Dodge value are provisional “Hits.” Then subtract Hits equal to the enemy’s Armor Value (minus your number Armor Piercing hits). Each remaining Hit does 1 damage to the enemy. Rolling 1s and 6s can trigger critical hit/miss rules, too.
In my image, my characters have advanced left to right across the map, collecting and consuming all the berries along the way, as they try to corner the Rat.
At the bottom (grey) is the enemy for my current battle encounter. Want to hear more?
The left enemy card shows their basic stats depending on their level, plus some niceties regarding combat and loot. The right enemy “Behavior” card is actually a lookup table of all their possible actions. Here I am fighting a Level 1 rat. I only need to deal 6 damage to win, but (as recorded by the die on the rat’s card) I have so far only dealt it 2 damage.
These cards are double-sided. If I flipped them over we’d be seeing info for the Crow enemy type.
The enemy action on a given combat turn is on the one hand tightly programmed. Every enemy action occurs in a sequence of selecting a target, taking actions towards them, and then (e.g.) stepping back or getting ready for next turn. But it’s also randomized, since the action-sequence is selected by a dice roll against the enemy’s unique lookup table. The damage that you’ve done so far to the enemy is added to the roll so that their behavior evolves over the course of combat – and since higher-level enemies can take more damage and keep going, they will evolve through a larger repertoire of possible behaviors “further down” the lookup table on the card. (Again, the iconography here may look a little daunting at first, but it’s all very sensible.)
Sometimes, if your characters’ Equipment Sets have enabled a “React” ability, you can interrupt enemy actions mid-sequence to take your React action (e.g., moving away or dealing return damage).
I still have a lot to learn, so I can’t offer a proper “review.” My greatest “win” so far has been understanding that it was time to give up when I reached the game-state in my image above. I thought I was making progress by upgrading the left/Pink character’s gear, but their new bow only lets them roll 1d6 for combat. Here I am fighting a unique rat (named “Old Bastard”) who has an armor value of 2, which always prevents damage from Pink’s 1d6 roll. Meanwhile, the right/Blue character can deal serious damage up close, but can’t move very quickly or take much damage. I should have been trying to keep Pink close to the rat to soak up damage, with blue dipping in to take potshots, then skipping away.
Having gone through all this, I now see how I could have anticipated all that with careful attention to the Rat’s cards. So I am expecting an FTL-like replayability progression here, where a big part of winning comes down to developing the acumen to see know when you’ve already lost, and when it’s time to start over, and how to do better next time.
The modularity of the design here is impressive. A serious expansion could consist of fewer than a dozen cards and a rules sheet, and yet could provide a new campaign map and end-boss, unique ingredient-types and equipment, unique encounter types, and unique enemies.
The current campaign is definitely built around combat (no non-combat encounters) and no room has been left on these cards for flavortext or narrative tidbits. I typically shy away from games that are quite so mechanical and strategic, but I am really fascinated by this one (and find its hand-drawn art quite charming), and I plan to spend more time with it. (Thanks for making it, Raoul!)